Monday, June 29, 2009

Managing devices on Server 2008 Core Edition

Windows Server 2008 Core Edition doesn't have any interfaces to speak of locally, so how do you manage hardware on the server? It's possible and easily done on the Core installation.

Like many other configurations in Windows, you need to enable firewall access. You can turn off the firewall for this task.

The next step is to enable access to the universal plug and play (UPnP) driver. You need group policy access to follow this step, so this can either be a domain-based group policy setting, or you can do it locally. My previous tip outlines accessing the group policy remotely.

The UPnP driver is located in the group policy at Computer Configuration | Administrative Templates | System | Device Installation. Figure A shows this value being configured to an enabled state.

Windows Server 2008, managed server

Once remote administration and UPnP is enabled in the local firewall profile, the server's hardware can be remotely managed with device manager. You can do this within the Computer Management snap-in by right-clicking the root of the tree and selecting Connect To Another Computer to connect to the Windows Core server.

Browse to the Device Manager section, and you are viewing the Core server's hardware inventory. Figure B shows the remote device manager.

remote device manager, Server 2008

The remote device manager does not allow corrections to the server, as it is read-only. For most situations using Windows Server 2008 Core Edition, the driver update could be performed by a running executable or command-line installation of the driver. Further, most situations using Core installation would not be dealing with a complex hardware inventory, as their placement will generally be purpose-built.

Source

Monday, June 22, 2009

How to Configure the VPN Server?

To continue to configure the VPN server as required, follow these steps.

How to Configure the Remote Access Server as a Router

For the remote access server to forward traffic properly inside your network, you must configure it as a router with either static routes or routing protocols, so that all of the locations in the intranet are reachable from the remote access server.

To configure the server as a router:

1. Click Start, point to Administrative Tools, and then click Routing and Remote Access.
2. Right-click the server name, and then click Properties.
3. Click the General tab, and then click to select Router under Enable this computer as a.
4. Click LAN and demand-dial routing, and then click OK to close the Properties dialog box.

Source: support.microsoft.com/kb/323441

Monday, June 15, 2009

Small Business Server 2003 Defaults

Maintaining a fully fledged IT support services can extremely be a daunting task for many small business owners Poor IT management can affect any size of business especially when your business operations hinge on network availability. Without the availability of proper technical support resources, small businesses have a high risk of failure.

In a default Small Business Server 2003 installation, groups and user assignments are setup in “defaults” mode, which can cause catastrophic issues if handled incorrectly. The best method to deal with this is to change all of the default groups and assignments and start with your own customized groups and security.

By default, Small Business Server 2003 is setup with a few groups for security based on a small business environment. The administrator, by default, is made a member of the domain power users security group. The domain power users security group is nested inside another group called SBS Remote Operators. SBS Remote Operators are defined by local and domain group policy to deny logon locally. Try to log in to the console, and you will be informed that your administrator has denied your access to log in interactively to the server.

The solution is to remove the administrator from the SBS remote operators group as well as domain power users groups. The administrator only needs to be in the domain administrators and enterprise administrators for your domain. Second, browse to group policy locally and on domain policy and make sure that deny logon locally is disabled.

Accidentally assigning the administrator to either the domain power users or any remote desktop groups ( SBS Remote Operators and Terminal Server Users) will cause major problems. If the administrator cannot log on locally, then services will not start and reinstallation will be imminent.

By default, the administrator has remote desktop authority, so no further setup is needed.

Source

Tuesday, June 9, 2009

Windows Server 2003 - Mail Server Installation

Have a look at Windows server 2003 mail server installation.

Source: http://www.youtube.com/watch?v=2zP77XWv-Hw

Tuesday, June 2, 2009

How to remove component from Windows Server 2008 R2 server core installation?

The Deployment Image Servicing and Management (DISM) tool can permanently remove components from the file system, which means the role or feature can never be installed on the OS unless you perform a full OS reinstallation. Only remove components if you're sure you'll never need them. Goto the %windir%\servicing\packages folder. Take a note of the component you want to remove (it has a .mum extension) and copy the file name (without the .mum extension) Click to expand. At an elevated command prompt, run the command dism /online /remove-package /packagename:

Note that it's generally not recommended that you remove components, because you can't reverse this operation. This function is there for specific situations, such as trying to run on a flash drive, embedded device, or other system without much disk space.

Source:windowsitpro

Wednesday, May 27, 2009

ADMT 3.1 Doesn't Install on Windows Server 2008 R2

Microsoft has confirmed that an integration issue exists between the Active Directory Migration Tool (ADMT) version 3.1 and the next iteration of the Windows Server platform. Specifically, ADMT 3.1 can fail to install on Windows Server 2008 R2, informing the customer that it has been tailored to the previous version of Windows Server, namely plain-vanilla Windows Server 2008.

Indeed, Microsoft lists only Windows Server 2008 as the sole operating system supported for ADMT 3.1, but at the same time the Redmond company did promise that backward compatibility would not be a problem when it comes down to Windows Server 2008 R2 and Windows Server 2008. However, Fournerat explained that the problem was in fact related to a specific scenario.

“This issue also occurs with Windows 2008 machines that previously had ADMT installed, and then upgraded to Windows 2008 R2. ADMT will no longer function correctly and returns the same error as detailed above. Microsoft is aware of the issue and diligently working on a resolution. Please stay tuned for further details and updates,” Fournerat added.

The Active Directory Migration Tool version 3.1 is designed to streamline the object migration and task restructuring process associated with an Active Directory Domain Service (AD DS) environment, according to the Redmond company. Administrators are able for example to transition local user profiles (security translation) concomitantly with inter-forest migrations. “You can use ADMT v3.1 to migrate users, groups, and computers between AD DS domains in different forests (inter-forest migration) or between AD DS domains in the same forest (intra-forest migration),” Microsoft added.

Active Directory Migration Tool version 3.1 is available for download here.

Wednesday, May 20, 2009

How to Install Windows 2000 after Windows XP

Install Windows 2000

1. Use a Win98/Me Startup disk (with CD support) to boot your computer. If you don't have one, you can download the files to make a boot disk at www.bootdisk.com
2.Insert your Windows 2000 CD into the CD Rom drive.
3.At the A: prompt type X:'I386'WINNT.EXE where X: is your CD-ROM drive.
4.Proceed with the install. Install Windows 2000 to a different partition than XP is installed in.
5.Complete the Windows install. Allow the computer to boot into Windows 2000.

Note: You may also want to read this thorough guide on how to Install Windows 2000 Server

Repairing the Windows XP Boot Loader

Note: Some users have reported that Step 1 is not necessary, but in testing I found that it was. Since the C: drive is FAT32, you can use a 98/Me boot disk and skip Step 1, if you wish, but you may find that you need to do it anyway.

Boot your computer with the Windows XP CD. When prompted to Setup or Repair, choose Repair. In the Recovery Console, enter the following commands.

1.FIXBOOT, answer Yes
2.CD '
3.ATTRIB -H NTLDR
4.ATTRIB -S NTLDR
5.ATTRIB -R NTLDR
6.ATTRIB -H NTDETECT.COM
7.ATTRIB -S NTDETECT.COM
8.ATTRIB -R NTDETECT.COM
9.COPY X:'I386'NTLDR C:'
10.COPY X:'I386'NTDETECT.COM C:'

In Steps 9 and 10, X is the letter of your CD-Rom drive.

Thursday, May 14, 2009

How to Add and Change Users in Windows XP and 2000

To add a user in Windows XP Home you can go to Start, Settings, Control Panel or to Start, Control Panel and then to user accounts. You will see a window like the following:

Windows XP tips

From here you can add a new user, change an existing user, change the picture used for that user account, assign passwords and change the way users log on.

The Windows XP Pro and windows 2000 user screen is setup differently because you have greater flexibility with your user settings and permissions. This is a sample of the User Accounts settings from Control Panel.

Windows XP and windows 2000 tips

You can also right click the My Computer icon and pick Manage to get to your user settings. This is also how you would manage your user accounts in Windows 2000.

Windows 2000 tips

From here you can right click a user to change that user's password. You can also double click a user and change properties such as password settings and group memberships.


Source: onlinecomputertips

Monday, May 11, 2009

Microsoft NLB - Network Load Balancing

The Network Load Balancing (NLB) role is available in Windows Server 2008. Every TS Gateway server member in the farm must install and configure NLB to form a fail-over load balancing server cluster. NLB distributes traffic between different TS Gateway server farm members. When a server in the cluster fails, NLB automatically removes the failed server from the cluster. The NLB cluster has a virtual IP address which is used by the clients to connect to the terminal server gateway farm. Figure 1 below illustrates load-balancing TS Gateway using NLB.

Microsoft, NLB, network load balancing

Source: blogs.msdn.com

Tuesday, May 5, 2009

10 Steps to Installing the Web Server Role in Windows Server 2008

Installing the role services selected in these steps will provide you with a web server with the following features and capabilities:

* Internet Information Services 7.0

* Common HTTP Features for serving static web content

* Application Development Services for hosting dynamic web content

* Basic logging functionality and tools

* Security Protocols for serving content securely to the internet or intranet

* All management tools for local and remote web server administration

* FTP Publishing Service for manageable file hosting

Performing the Web Server Role installation requires the administrative credentials of the IIS Web Server Administrator role. Once logged in with the proper credentials, you’re ready to start:

1. Launch the Add Roles Wizard using one of these methods:

* On a new Windows Server 2008 installation click Add Roles from the Initial Configuration Task Window

* From the Server Manager click Add Roles from the Roles Summary or Roles Manager

2. The Add Roles Wizard will begin with some recommendations for the installation; click the Next button to proceed.

3. You may be prompted to add the Windows Process Activation Service feature, in this case click the Add Required Features button.

4. From the Select Server Roles Wizard step check the box labeled Web Server (IIS) and click Next to continue.

5. After reviewing the Web Server Installation introduction, click the Next button to begin selecting the role services to install.

6. The role services selected in the left column are the default for a new Server 2008 installation. In order to install a web server with the functionality outlined in this exercise, check the boxes for the role services selected in the right column.

7. After checking the box labeled Application Development, you may be prompted to add the .NET Environment, if it is not already installed. Click the Add Required Features button to continue selecting role services.

8. Once you’ve completed selecting the role services to install for your web server, click the Next, button to proceed.

9. Review the installation selections and confirm them by clicking the Install button. The Add Roles Wizard will then perform the installation of the selected role services.

10. When the wizard is finished installing the roles, review the installation results and click the Close button to complete the installation.

Source: windowsserver.trainsignal

Friday, April 24, 2009

How To Install Windows Small Business Server 2008?

Windows Small Business Severs 2008 (SBS 2008) is the successor to SBS 2003, and it brings the various components SBS is based on up to date.

Installing Small Business Sever 2008

The main purpose of SBS 2008 is so that small businesses without technical support staff can take advantage of Microsoft’s powerful, but complex server based technologies. For this reason, most people will purchase a SBS 2008 server from the manufacturer with SBS 2008 already installed.

In that case, setup will only require handling the server configurations steps. However, in the interest of being complete, we’ll cover the full installation from the DVD installation media.

If you’ve setup a couple of workstations before, you may be used to installing the computer and then worrying about getting the network setup later.

With SBS 2008, it needs the network connection from the very beginning, so this is not an option. Make sure that your live network connection is plugged into the SBS 2008 server before starting the installation.

1. Put the SBS 2008 DVD in the DVD drive and power up the computer. Your specific computer will determine what you see as the server boots up.

Look for a message that says something like, "Boot Menu," or "Choose Boot Device," or "Press F10 To Enter Boot Menu".

The server may go right to a screen which allows a choice of boot device based on detecting the boo table SBS 2008 DVD in the drive.

2. Select to boot from the DVD.

3. If you’ve never installed a Server in a country other than America, the next three questions seem a little silly. Choose the Language, the Time and Currency format, and the Keyboard Type.

4. Click Next, and then Install Now.

5. Inputting the product key and agreeing to the license agreement are next. Now, we can get down to some real business.

6. Choose Custom for the installation type. This allows you to choose where to put the operating system.

Ideally, SBS 2008 should have the operating system on its own partition on its own hard disk and the data on a separate partition and separate disk or disks.

To accomplish this, select the disk the operating system is to be installed on and Choose Drive Options and click New.

The default partition size that appears will be the size of the entire disk. Click Apply and setup will create a single partition which fills the entire disk. This will be the SBS 2008 system partition.

7. Setup will begin copying files to do the install. Keep in mind that this is around 60GB worth of files, so even on a fast system, this will take several minutes.

Source: http://www.trainsignaltraining.com/how-to-install-windows-small-business-server-2008/2008-12-02/

Monday, April 20, 2009

How to Install Web server on Windows Server 2008 from a script

You can usually add features through the Windows Server 2008 Server Manager snap-in via a script. In the case of IIS 7.0, there are many options available for the feature install.

One way to ensure a consistent configuration for applications that require IIS (e.g., SQL Server) is to use a scripted installation. For IIS, the package manager can install the features locally. To install a basic IIS configuration, run the following script:

start /w pkgmgr /iu:IIS-WebServerRole;IIS-WebServerManagementTools;
IIS-ManagementService;IIS-Metabase;WAS-WindowsActivationService;
WAS-ProcessModel;WAS-NetFxEnvironment;WAS-ConfigurationAPI

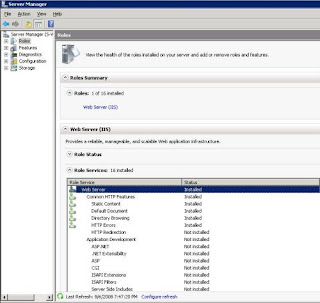
The command provides little interaction and, by default, does not provide feedback of any type if an incorrect parameter is passed after the /iu parameter. Figure A shows IIS being added via the script.

Install Web server on Windows Server 2008

Once the scripted task completes after a minute or so, and the Window Server 2008 Server Manager snap-in performs its next refresh, the Web server is listed as a role on the system and is running. Figure B shows an updated Server Manager snap-in with this basic IIS role.

Windows server 2008

Using this scripted install of IIS is a good way to ensure consistent server build configurations, and other Windows features can be automated through the package manager (pkgmgr). The package manager can also uninstall packages, which may be helpful for temporarily enabling a feature for a specified amount of time and for removing the feature from a scheduled task to ensure its decommissioning.

Source: http://blogs.techrepublic.com.com/datacenter/?p=442

Wednesday, April 15, 2009

Windows Server 2008 Feature: Special Ops Software Password Policy and Password Reset

One of several significant advancements introduced in Windows Server 2008 domain functional level is the ability to configure multiple password policies targeting arbitrarily selected Active Directory users or global groups. While this new functionality, referred to as Fine-Grained Password Policies, brings long-awaited flexibility to rigid security structure that used to influence design of forest hierarchy (forcing the creation of additional domains whenever non-uniform rules governing password history, age, length, complexity or lockout behavior were required), its benefits remain somewhat limited. In particular, due to functional-level dependency, its implementation requires all domain controllers run Windows Server 2008. In addition, because Fine-Grained Password Policies lacks a friendly graphical interface, administrators must resort to a fairly cumbersome ADSIEdit console whenever a custom policy definition or configuration is needed.

Furthermore, the scope of these policies is determined based on global group membership, rather than the location of a target user within a designated Organizational Units, which further complicates their management.

If these shortcomings are not acceptable to you or if you are looking for more advanced password-related capabilities, you might want to consider taking advantage of third-party offerings, which go beyond the limited set of features built into the operating system.


Special Operations Software specializes in products targeting Windows environments with intention of filling functionality and manageability gaps existing in their original feature sets designed by Microsoft. In general, its portfolio can be grouped into several broader categories, such as system management, compliance or security, based on the type of need they address, with a certain degree of overlap between them.

Since the resulting restrictions become part of the User Configuration node of a Group Policy Object, they function in the same manner as other group policy settings. For this reason, they can be linked to individual Organizational Units and limited, if desired, based on security filtering to specific domain users or groups only. Note, however, that resulting passwords must comply not only with custom restrictions imposed by Specops password definitions but also with domain-wide, built-in password policy imposed via domain-level GPO. In addition, if you decide to install optional Active Directory Users and Computers extension, you will be able to determine password policies affecting individual user accounts (via Specops Password Policy... entry in the context-sensitive menu of their objects displayed in the management console) from the administrative systems where Specops Password Policy Admin is present.

For Detail Info visit: http://www.enterpriseitplanet.com/security/features/article.php/11321_3812801_1

Thursday, April 9, 2009

How to Install IIS Server 7.0 On Windows Server 2008

Internet Information Services 7.0 is a Web server component that is included with Windows Server 2008. By installing the service, you can turn your computer into a powerful Web server to host your Web sites, applications
and so on.

IIS 7.0 is not installed by default on Windows Server 2008. You can install IIS using Server Manager. The ‘Add Roles Wizard’ will walk you through the process and prompt you for any required information. The steps for installing IIS 7.0 are described in detail below.

  • Click Start, point to Administrative Tools and click Server Manager.
  • Click Add Roles.
  • The Add Roles Wizard will appear. Click Next.
  • If any required features are missing, you will be prompted to install them by clicking the Add Required Features button.
  • From the Select Server Roles window, click the box beside the Web Server (IIS) option. Click Next.
  • Click Next.
  • Select the specific role services to install for IIS. If you are unsure what a service is for, select the service and a short description will appear.
  • Click Next.
  • Review your installation selections and click Install.
  • When the installation is complete, review the results in the ‘Installation Results’ window and click Close.
Source From: http://www.lockergnome.com

Thursday, April 2, 2009

How to Configure Wireless settings via Group Policy

Wireless networking in an office environment can supplement the Ethernet network in case of an outage or, in some cases, replace it altogether. Using Wireless Access Points (WAPs) to connect remote users or desktop PCs can be a very simple way to get everything up and running quickly. And leveraging the power and centralization of Active Directory when setting up your wireless infrastructure can save time for all parties involved.

Getting started

To get the ball rolling, I suggest creating a new Group Policy Object (GPO) to configure for Wireless settings. This will keep all the wireless settings contained so they can be enabled and disabled easily. Note: when performing the steps needed to configure these settings, I will be using the Group Policy Management Console (GPMC) — available at Microsoft downloads.

Follow these steps:

1. Open the GPMC from the Administrative Tools menu.
2. Expand the Forest node on the left pane of the console.
3. Expand Domains and expand your domain.
4. Locate the Organizational Unit (OU) where you wish to link the GPO.
5. Right-click the OU and select Create and Link a GPO Here.

Note: Once the GPO is added here, any objects that exist in this OU will have the policies defined by the linked GPOs applied to them.

Enter a name for the GPO you are creating and click OK. Doing this will create the object and link to the OU. Be sure to use a descriptive name for the GPO to make future management a bit easier. Once the object is created, there will be no settings defined within the object. Right-click the GPO and select edit to configure the settings you need.
Many, many settings for a GPO

When opening the GPO for editing, there will be many options available for configuration. To find the Wireless settings, expand the computer configuration node, then expand Windows Settings and from there, Security Settings.

Listed under Security Settings you will see Wireless Network (IEEE 802.11) Policies. Click on this node to display any existing configuration items.
Creating a new Wireless Network Policy

Right-click in the details pane on the right of the console with the Wireless Network Policies node highlighted and select Create Wireless Network Policy.

This will open the Wireless Network Policy Wizard. Click Next to bypass the welcome screen. On the next screen, enter a name for the Wireless Network Policy and a description.

Note: Using a description can help you in the event that modifications are needed later.

Clicking Next in the dialog box will complete the wizard and display the Completing the Wireless Network Policy Wizard dialog box. Leave the Edit properties box checked so that you can move right into creating the settings for the policy.

On the properties sheet for the Wireless network policy, the general page displays the settings created by the wizard, the name and description, but also allows you to configure the following:

* Check for Policy Changes Every x Minutes allows you to set the interval for checking for updates.
* Networks to Access options:
o Any available network (access point preferred)
o Access point (infrastructure) networks only
o Computer to computer (ad hoc) networks only
* Use Windows to Configure Wireless Network Settings for Clients allows Windows to manage the wireless settings on client computers.
* Automatically Connect to Non-Preferred Networks allows you to connect to networks that are not listed on the preferred tab of the properties dialog box.

For More Information visit: http://blogs.techrepublic.com.com/networking/?p=1093&tag=rbxccnbtr1

Monday, March 30, 2009

How to Manage BIOS updates with Windows Server 2008

For Windows Server 2008, the Core Edition has scenarios where its use is appropriate. In some cases, the Core Edition is even required like the free version of Hyper-V. For managing the hardware, this throws some curve balls to the Windows administrator.

The first thing install Opera on Core Edition servers — primarily because using Opera on the Core Edition will give a crude file manager function by typing C:\ in the address bar.

To install Opera, simply download it from another system and save the installation file to the C:\ drive of the Core Edition server and run the setup. From there, I can get the server’s updated BIOS firmware. Figure A shows Opera functioning as a file browser.

Manage BIOS updates with Windows Server 2008

Prefer Opera, but other browsers may work. Remember, the Core Edition has no version of Internet Explorer, but other versions are installable on Core.

Get drivers and updates

For the hardware updates, you can get them from a local resource or the server support page and download them like you would on a full installation version. I recently updated an HP ProLiant ML350 G5 server to the latest BIOS, version D21 on a Windows Server 2008 x64 Core Edition system. The online flash tools for HP will run in the same fashion as they would on a full installation version. Figure B shows the installation of the update after the download.

BIOS Updates in Windows Server 2008

Legacy mechanisms such as floppy-based flashing are still possible, but they are archaic and more time-consuming than some of the online mechanisms available. It is worth going through the learning curve on Core Edition to maintain the same flexibility levels as the full installation versions of Windows Server 2008.

Source: http://blogs.techrepublic.com.com/

Monday, March 23, 2009

HP NS2000 Server Point for Small Businesses

HP Integrity NonStop NS2000 server offers 24/7 availability at price point for small businesses.

All of the websites and most of the applications that are used online are hosted on servers. In the corporate world, many applications used around the office are also server-based. Many of the servers in use in the IT world are required to be available constantly without downtime.

HP announced a new server today that promises non-stop availability at a low price called the HP Integrity NonStop NS2000 server is an entry-level product that offers fault tolerance at the lowest cost available for a multi-core Integrity NonStop system.

Jim Johnson from the Standish Group said in a statement, "There is a large segment of smaller enterprise customers that tends to be priced out of the market for high-end, fault-tolerant servers. For those customers, the NS2000 server offers significant value and additional choice for application availability and fault tolerance."

The NS2000 is a rack-mounted server HP claims offers double the performance of the previous NonStop entry-class systems. The system uses Intel Itanium processors and offers 24/7 data availability and real-time access to critical business systems.

HP's Winston Prather said, "Customers with limited IT resources are looking for cost-effective solutions that quickly and easily deliver the fault-tolerant capabilities they need to minimize risk of downtime. The NS2000 Integrity family delivers the performance and reliability our customers need right out of the box, at a very competitive price point."

Several NS2000 models are available with a variety of configurations based on customer needs. Systems offer a choice of four-core and eight-core CPUs with 8GB or 16GB of RAM per CPU with AC and DC powered versions available. Pricing depends on configuration reports HP.


For more information Visit Here

Sunday, March 15, 2009

How to migrate Windows Server 2003 TS License Server

License Server migration is an added feature in Windows Server 2008 R2. In Windows Server 2008 R2, when you right-click on the server name you will see the ‘Manage RDS CALs’ option. After selecting this, you will see the ‘Manage RDS CALs Wizard’ to guide you through the migration process. But to migrate Windows Server 2008 license server, you need to follow the same steps as mentioned in the post.

The migration of your license server requires three stages.

1. First, you must activate the new license server.

2. Next, you need to deactivate the old server.

3. Lastly, you need to move all the licenses from the old server to the new server.

To migrate your license server:

Step 1: Activate the new license server:

  1. Set up the VM guest as a Win2003 TS license server.
  2. Open the TS License Manager tool (licmgr.exe)
  3. Activate the server by right-clicking on the server name under the ‘All servers’ node in the left pane and selecting ‘Activate Server’. The Activate Server Wizard will open.
  4. Click Next. Select ‘Telephone’ as your connection method and click Next.
  5. On the ‘Country or Region Selection’ page, select your appropriate country and region.
  6. The next page will provide you with the License Server ID and the Microsoft Clearinghouse telephone number to call. Write them on a piece of paper but don’t make the call yet. You may want to keep the wizard open.
Step 2: De-activate the old license server:
  1. Open the TS License Manager tool on your old license server.
  2. Change the connection method to telephone by right-clicking the server name under the ‘All servers’ node in the left pane, selecting ‘Properties,’ and setting the connection method to ‘Telephone’.
  3. Again right-click the server name under the ‘All servers’ node in the left pane, select ‘Advanced’ and then select ‘Deactivate Server.’ The License Server Deactivation Wizard will open. Click ‘Next’.
  4. On the ‘License Server Deactivation’ page, you will be provided with the same clearinghouse phone number and the License Server ID of your old server. Make a note of this License Server ID as you need to provide this to Microsoft Clearinghouse.
  5. Call Microsoft Clearinghouse at the number you have noted and give them the product ID of the new license server which you want to activate and of the old license server which you want to deactivate. Once you have given them this information, Microsoft Clearinghouse will provide you with the confirmation code. Enter this code into the License Server Deactivation Wizard when prompted.
Step 3: Move each of the license key packs one by one, from the older LS to the new one:
  1. On the same call with the clearinghouse, inform them that you also want to migrate the licenses.
  2. Open the License Install Wizard on the new license server.
  3. Provide the following information to the clearinghouse which they will use to generate the new License Key Pack ID:
    1. The license server ID of the old license server
    2. Paper work for the original TS licenses
  4. Enter the new license key pack ID in the Install License Wizard and complete the License Installation on the new license server.
  5. Repeat the same process for migration of all license key packs.
Source: http://blogs.msdn.com/ts/archive/2009/03/06/migrating-a-windows-server-2003-license-server.aspx

Thursday, March 5, 2009

Windows Server 2008 Service Pack 2 and Windows Vista Service Pack 2 Release

Windows Server 2008 Service Pack 2 (SP2) Release Candidate and Windows Vista Service Pack 2 (SP2) Release Candidate is an update to Windows Server and Windows Vista that addresses feedback from our customers.

Windows Server 2008 SP2/Windows Vista SP2 Release Candidate is prerelease code offered to the public through our Customer Preview Program. Please see the Windows Server SP2/Windows Vista SP2 Customer Preview Program page on TechNet/MSDN for additional details, documentation, and forums.

Windows Server 2008/Windows Vista SP2 Release Candidate apply to people, organizations, and technical enthusiasts who are comfortable evaluating prerelease software. This prerelease software is provided for testing only. We do not recommend installing this software on primary or mission-critical systems. Installation of Service Pack 2 Release Candidate will result in Microsoft collecting information about the installation process, even if the installation is not completed. Wet recommend that you have a backup of your data before you install any prerelease software.

SP2 is an update to Windows Vista and Windows Server 2008 that addresses feedback from our customers and partners. By providing these fixes integrated into a single service pack, Microsoft provides a single high-quality update that minimizes deployment and testing complexity for customers. In addition to all previously released updates, SP2 will contain changes focused on addressing reliability and performance issues, supporting new kinds of hardware, and adding support for several emerging standards. SP2 will also continue to make it easier for IT administrators to deploy and manage large installations of Windows Vista and Windows Server 2008.

Service Pack 1 is a prerequisite for installing Service Pack 2. Please make sure that your system is running Service Pack 1 before you install Service Pack 2.
This is a DVD ISO image contains Service Pack 2 for Windows Server 2008 SP2 for x86, x64, IA-64 and Windows Vista for x86, x64. This image is only applicable to computers that have one or more of the following languages: English, German, French, Japanese, or Spanish. If you have an OS or language pack that is not one of these languages please use the "All Languages" version of Service Pack 2.

Support for Windows Server 2008 SP2 Beta and Windows Vista SP2 Beta can be received by visiting the Windows Server 2008 Service Pack 2 and Windows Vista Service Pack 2 TechNet forum.

System Requirements

* Supported Operating Systems: Windows Server 2008; Windows Vista
* Windows Server 2008, Windows Vista

Instructions

1. To start the download, click the Download button and then do one of the following, or select another language from Change Language and then click Change.
* Click Run to start the installation immediately.
* Click Save to copy the download to your computer for installation at a later time.


Source: http://www.microsoft.com/downloads/details.aspx?FamilyId=0A3D7A63-46AF-4E04-AC8C-91B8BC476450&displaylang=en

Tuesday, February 24, 2009

Configure Time and Date Settings in Windows 2008 Server Core

As you may all know, setting the right time, date and time zone on a windows machine is crucial for it to properly function, especially in an Active Directory environment. Since our Server Core machine will most likely be a part of an AD domain, we need to properly configure it as well.

In order to configure time, date, and time zone settings on a machine running Windows 2008 Server Core, please follow these steps:

1. On the server running a Server Core installation, type the following command at a command prompt:
Control timedate.cpl
This will fire up the Time and Date Control Panel applet (one of two .CPL survivors on Server Core…)

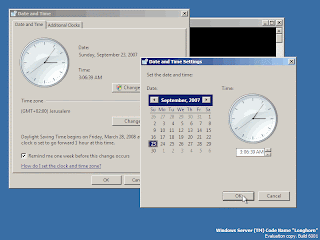
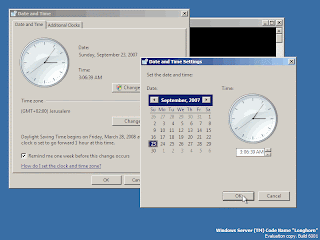
Time and Date Settings in Windows 2008 Server

2. In order to change the clock and date, press the Change Date and Time button.

Windows server 2008 services

3. In order to change the time zone, press the Change Time Zone button.

Windows server services

4. When done, press Ok to close the applet.

Source: http://www.petri.co.il/configure-time-date-settings-windows-2008.htm

Wednesday, February 18, 2009

Using Storage Explorer in Windows Server 2008

Getting a server connected to an iSCSI or fibre channel SAN is generally straightforward. Across platforms and products, there are many tools to go about doing this.

Windows Server 2008 offers a way to browse the SAN natively. This tool, Storage Explorer, is an Explorer-style console to view a local configuration and remote resources.

Storage Explorer puts all of the components of the SAN into one console for administrators. This can include providing the host bus adapter (HBA) information and quantity of interfaces. For each HBA, the worldwide port name (WWPN) is displayed in relationship to what server holds the WWPN and HBAs.

Storage Explorer will also show what switches and fabric are available to the HBA on the local system; or like with many other Windows tools, remote systems can be managed through Storage Explorer. Figure A shows a connection being made to a remote server using Storage Explorer.

Windows Server 2008

While this native operating system tool is convenient and easy to use for most installations, the purist side of the storage administrator will not prefer this type of tool. The standing preference among storage administrators is to use an end-to-end configured and supported solution from the storage vendors. In this configuration where there would be an Emulex HBA in the server, the configuration around the product would match various support levels on the storage side. This would include using the Emulex driver and the HBAnywhere local tool on Windows Server. For QLogic HBAs, the same may apply and use of the QLogic driver and the SANSurfer tool would perform the same function on the server side.

Storage Explorer fits nicely into connecting a system to a SAN quickly, especially if the HBA vendors do not have Windows Server 2008 support for the driver and management tools.

Source: http://www.builderau.com.au/program/windows/soa/Using-Storage-Explorer-in-Windows-Server-2008/0,339024644,339294715,00.htm

Wednesday, February 11, 2009

How can I install Windows 7 or Windows Server 2008 R2 to a virtual hard disk (VHD) file?

Windows 7 and windows Server 2008 R2 add the ability for an OS to be installed onto a virtual hard disk (VHD) file to boot physical hardware. To do this, perform the following steps: Boot from the Windows 7 or Server 2008 R2 media.

Select language options and click Next. At the Install Now screen, press Shift and F10 simultaneously to open a command prompt window. You'll partition the disks and create your VHD file in this window.

Select the disk and wipe all of its existing content using the following commands. diskpart list disk select disk 0 clean Create a 200 MB system partition using the following commands. The Windows 7 and Server 2008 R2 installation procedures normally create this partition automatically. create part primary size=200 format fs=ntfs label="System" quick active Create a partition using the rest of the space on the disk.

This partition will hold the VHD files. I call the partition Boot, but you can call whatever makes sense for you. Also, I've used the C drive, but when you boot to the VHD the drive letters will shift. If you assign a different letter, make sure to use the new letter in step 7. create part primary format fs=ntfs label="Boot" quick assign letter=C Create a VHD file on the C drive. In this example, I've created it as a 25 GB file that is an expandable disk.

You can use "type=fixed" instead of "type=expandable" to create a fixed-size VHD. A fixed-size VHD will use space on the physical disk equal to its full size as soon as the VHD is created but will give better performance, so I recommend fixed-size disks for uses other than testing. create vdisk file=c:\win7ult.vhd maximum=25000 type=expandable select vdisk file=c:\win7ult.vhd attach vdisk create partition primary format fs=ntfs label="Win7Boot" quick You can now list your volumes with the command list vol An example list is shown here.

Click to expand Exit Diskpart and close the command prompt window by entering the "exit" twice. Proceed with the installation. When you're asked to select the installation target, choose the VHD partition you created. The installer will warn that you cannot install it on the partition, but you can ignore the warning.

Click to expand Installation will now progress as usual. Once installation is finished, you can see that the VHD partition is now the C drive while the partition containing the VHD files is demoted down to the D drive, as shown here. If you look at the contents of the drives, you'll see D contains the VHD file and C, the content of the VHD, looks like a standard drive with a Windows installation. The 200 MB partition you created doesn't have a drive letter and is essentially invisible to the OS.

Source: http://windowsitpro.com/mobile/pda/Article.cfm?ArticleID=101456&FAQ=1

Thursday, February 5, 2009

Business Security for Small Business

Here would be a couple of pointers to reduce threats in security for your small business.

Try to scrutinize your employees before hiring them. You might want to check their personal references and a conduct a background check. Like the common preventative measures, it would be less expensive compared to having to deal with the bad consequences. However, it would take time.

Limit the access that your employees have to your company data and server. If you have a server room which is regularly locked, however the person who keeps the key to that room keeps it on his desk which is accessible by anybody, then what you are doing is pretty much useless.

Require your employees to use good password, which should be regularly changed. This may cause some negative reactions, but it would prove to be a security measure that would be valuable in the long run.

Make sure that your data is backed up regularly. It would be advisable to backup company data daily, if possible. And at weekends, you would also need to do a backup, which would be taken off site and then stored.

Invest on a virus protection software, as well as a digital intrusion detection software which must be installed and reviewed regularly. If you would be outsourcing your IT services, the company which would be providing these services should also be able to provide a virus protection software this for you.

Though it could be possible to go a bit overboard on the security measures, which you would be using, there are actually a handful of companies who do so and a lot do not even have a basic security plan in place. If your business is important to you, it would definitely be important to invest in an excellent and effective small business security coverage.

Source: http://www.articlesbase.com/web-hosting-articles/business-security-for-small-business-373589.html

Tuesday, February 3, 2009

Windows Server 2003 Install and Configure Automatic Client Update Settings

Install and Configure Automatic Client Update Settings: The client components for SUS are contained in Windows 2000 SP 3, Windows XP SP 1, in all Windows 2003 installations and as an msi file. For Windows 2000 SP 3 or later, no additional component installation is necessary. Older client operating system machines can either download the necessary components from the Microsoft public Web site, or create a package from the msi file and Group Policy for distribution internally. The recommended way to configure SUS behavior for Windows 2000 and Windows XP clients is through Group Policy. Group Policy settings always take precedence over local settings.

In Group Policy, select Computer Configuration | Administrative Templates | Windows Components | Windows Update .Double-clicking on Configure Automatic Updates will open the initial configuration dialog.

Once enabled, you have to choose from three options (2, 3 or 4) for the notification behavior. If 4 is chosen, then the update can be scheduled. This is the primary configuration for client settings. The other major setting is the next setting, Specify intranet Windows update service location. This allows you to tell the client the server from which to download updates, and also where to send statistics relating to downloads.

Configure Software Updates on Earlier Operating Systems: For earlier Windows operating systems, Group Policy will not be effective. For Windows NT, Microsoft recommends using the System Policy editor. For all down level, clients use registry edits. Use these edits with caution because they can cause serious problems on a machine. The registry settings are stored in HKLM\Software\Policies\Microsoft\Windows\WindowsUpdate\AU. To specify the server running SUS that you want your clients and servers to connect to for their Windows updates, you need to add two entries to the registry in the subkey HKLM\Software\Policies\Microsoft\Windows\WindowsUpdate. For the required entries, see

Entry Name Values Data Type
WUServer The HTTP name for the Windows Update intranet server (for example, http://intranetsus). Reg_SZ
WUStatusServer The HTTP name for the Windows Update intranet server (for example, http://intranetsus). Reg_SZ

Source: http://www.trcb.com/Computers-and-Technology/Windows-Server-2003/Windows-Server-2003-Install-and-Configure-Automatic-Client-Update-Settings-2204.htm

Wednesday, January 28, 2009

How to Install SharePoint Server 2007 on Windows Server 2008 RC1

Below are the some tips how to Install SharePoint Server 2007 on Windows Server 2008 RC1:

1. You must enable the IIS7 Feature Role on Windows Server 2008 RC1 with .NET 3.0

From Control Panel, Programs and Features, Select 'Turn Windows Features On or Off'
Next, Under 'Server Manager, Features' Select '.NET Framework 3.0 Features'. When asked
to install the IIS7 role, select yes. Under IIS7 'Security', be sure to select the authentication
you want, i.e. Basic, NTLM, Kerberos, etc. Next, you must slipstream
Windows SharePoint Server 3.0 SP1 AND SharePoint Server 2007 SP1 into your SharePoint Server 2007 installation directory.

2. I used Winrar to extract the files from my SharePoint Server 2007 ISO, but you can also
copy them into a directory directly from the DVD. Create a directory, we'll use c:\Slipped for our installation point. Copy the entire DVD contents to c:\Slipped

3. Next, you must download and extract both Windows SharePoint Services SP1 and SharePoint Server 2007 SP1
you can get them here http://blogs.msdn.com/sharepoint/archive/2007/12/11/announcing-the-release-of-wss-3-0-sp1-and-office-sharepoint-server-2007-sp1.aspx

First, create a directory to host the WSS 3.0 files after extraction. We will use c:\wsssp1
Second, create a directory to host the SharePoint Server 2007 files after extraction. We will use c:\mosssp1 Third, we will assume we have downloaded both service packs to c:\

Extract the WSS 3.0 service pack files by executing 'c:\wssv3sp1-kb936988-x86-fullfile-en-us.exe /extract:c:\wsssp1' Agree to the license terms, and the service pack will unpack.

Extract the SharePoint Server 2007 service pack by executing 'C:\officeserver2007sp1-kb936984-x86-fullfile-en-us.exe /extract:c:\mosssp1' Agree to the license terms, and the service pack will unpack.

4. Copy the service pack files from the above directories into the installation updates directory.

If you are using x64, replace the 'x86' in the following instructions.

Copy the contents of both c:\wsssp1 and c:\mosssp1 into 'c:\slipped\x86\updates'

5. Last, run the setup from the x86 directory, and it should install!

From: http://www.mindsharpblogs.com/ben/archive/2007/12/16/3837.aspx

Wednesday, January 21, 2009

How to install application on Windows 2008 Terminal Server

It’s recommended to install Terminal services role before installing any application which will be available to terminal server users. If TS role installed after the applications are installed, some the application may not work correctly in a multiple user environment.

In that scenario uninstalling and reinstalling the affected programs can resolve the issue.

To ensure that an application is installed correctly to work in a multiple user environment, the Terminal Server must be switched into Install mode before applications are installed on the server.

A Terminal Server canbe placed into Install mode using one of the following methods:

++Using the Install Application on Terminal Server tool in Control Panel\Programs.

This tool is available only when we install terminal server. It will automatically put terminal server into execute mode when application installation is complete.

++ Run Change user /install from command promptto place the server into Install mode and install the application. After installing the application, use the Change user /execute command (or restart the server) to place the server back into Execute mode before using the application.

Change user /query command can be used to find the current mode.

When an application is installed in Install mode, HKEY_CURRENT_USER information is primarily written to the following registry key:

HKEY_LOCAL_MACHINE\SOFTWARE\Microsoft\Windows NT\CurrentVersion\Terminal Server\Install

This information is then circulated to HKEY_CURRENT_USER for each user when they log on to the Terminal Server.

Source & Inspiration from: http://blogs.technet.com/perfguru/archive/2008/06/30/how-to-install-application-windows-2008-terminal-server.aspx

Friday, January 16, 2009

Microsoft Windows Home Server Should Work with Windows 7

With Windows 7 having hit Beta stage and being available for download to the general public, users will get the chance to try first-hand the next iteration of the Windows client. One critical aspect to the success of Win7 will be the level of compatibility that existing software solutions will deliver when it comes down to this particular software solution. Microsoft promised that, because it was an evolution of Windows Vista, Windows 7 would be compatible with the same software as its predecessor, virtually out of the box.

"The Windows Home Server automated image-based backup and restore solution works with PCs running Windows XP and Windows Vista today, and should also work with Windows 7. Please download the Windows 7 beta and try it out. Let us know if you have any issues. If you don't have a home server yet, now might be a good time to get going," Todd Headrick, the product planner for the Microsoft Windows, revealed.

And indeed, users of Windows Home Server will be able to install the Windows Home Server Connector software on Windows 7 Beta without any issues. At the same time, Windows Home Server will back-up Win 7 Beta, just as it would previous releases of Windows. Headrick advised users to backup their machine to Windows Home Server before deploying Windows 7 Beta. In this manner, WHS will offer an easy way of turning back the clock by restoring the image created by the home server, ahead of installing Windows 7.

"If you run into a bug with using the Windows Home Server Connector on the beta release of Windows 7, please let the home server team know through our Connect site. A few people have notified us that we incorrectly display 'Windows Vista...' for the operating system name in the Windows Home Server Console and the Windows Home Server Remote Access page – we already have a fix in the works for those bugs,” Headrick added.

Windows 7 Beta: Download

Source: http://news.softpedia.com/news/Microsoft-Windows-Home-Server-Should-Work-with-Windows-7-101882.shtml

Wednesday, January 14, 2009

Small Business Computer Support Services - Solution to All your Small business Problem

Whether you own a home business or small scale business, you must have noticed the pace of change in technology. For a non-tech person, it is virtually impossible to stay abreast of increasing advancements in technology. Fortunately, there is a variety of computer support and online computer help resources to restore a sense of security when faced with technical complexities.

Emerging at the top of the chain of computer support options is online PC repair. The latter has become an effective service offering the best to companies especially small businesses and is best suited to assist customers with troubleshooting computer problems, virus and spyware infections, and other critical issues such as the blue screen of death error. As such, online personal computer repair has proved its mettle for most issues.

Every good small business technical support company first diagnoses your computer problems through an online session or over the phone. Online PC repair is most helpful for small businesses at the time of troubleshooting software problems. Starting out with simple issues such as those of installation of any software programs to critical like fixing blue screen of death error, you can contact these technicians for anything related to your PC.

Likewise, online PC repair is the simplest, cheapest yet the most self sufficient service for small business computer support to sort out any kind of software defaults. Also it eliminates a need for you to hire full time IT staff, thereby saving loads of money. The ongoing fierce competition has led several computer support centers to launch service packages including a comprehensive array of support services for different purposes. For ex: You can ask for a Small Business Support pack to fulfill your individual computer needs. You may also ask your support technicians for customized solutions depending upon specific business needs.

Small businesses are finding support sessions useful as they offer support to meet the criteria of your business. Whether it's a sudden server crash or virus outbreak, you can be assured to get your computer problems solved onsite within no time.

By working with a company that offers a combination of computer technician services and online PC repair, small businesses can avail the IT support services they need without the heavy price tag associated with it.

Source: http://www.goarticles.com/cgi-bin/showa.cgi?C=1058915

Tuesday, January 6, 2009

Remote Control in Windows Server 2008

Microsoft developers have introduced a remote administration tools pack, which ships with Windows Server 2008 CD. The feature, called RSAT - Remote Server Administration Tools, is available with Windows Server 2008 and enables remote management of Windows Server 2003 and Windows Server 2008 computers from a computer running Windows Server 2008. RSAT is secure by default because it opens only those ports that the tools require.

How do you install RSAT?

You can install Remote Server Administration Tools in one of the following ways:

  • Server Manager
  • Initial Configuration Tasks
  • Control Panel

Note: You must be a member of the Administrators Group or logged on using the built-in administrator account.

If you are installing RSAT by using the command line, you must open the Command Prompt with elevated privileges.

Now, you can also manage Windows Server 2008 computers from a Windows Vista SP1 client computer. You must download the tools for Vista client at http://www.microsoft.com/downloads/details.aspx?FamilyId=9FF6E897-23CE-4A36-B7FC-D52065DE9960&displaylang=e


Source: http://www.serverwatch.com/tutorials/article.php/3779931