Tuesday, February 24, 2009

Configure Time and Date Settings in Windows 2008 Server Core

As you may all know, setting the right time, date and time zone on a windows machine is crucial for it to properly function, especially in an Active Directory environment. Since our Server Core machine will most likely be a part of an AD domain, we need to properly configure it as well.

In order to configure time, date, and time zone settings on a machine running Windows 2008 Server Core, please follow these steps:

1. On the server running a Server Core installation, type the following command at a command prompt:
Control timedate.cpl
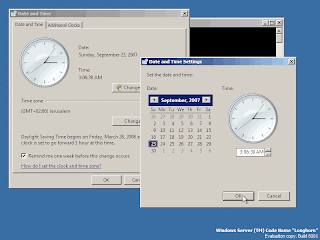
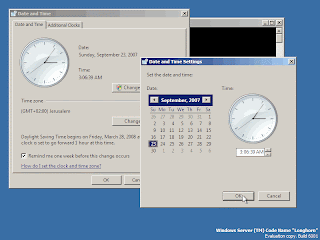
This will fire up the Time and Date Control Panel applet (one of two .CPL survivors on Server Core…)

Time and Date Settings in Windows 2008 Server

2. In order to change the clock and date, press the Change Date and Time button.

Windows server 2008 services

3. In order to change the time zone, press the Change Time Zone button.

Windows server services

4. When done, press Ok to close the applet.

Source: http://www.petri.co.il/configure-time-date-settings-windows-2008.htm

Wednesday, February 18, 2009

Using Storage Explorer in Windows Server 2008

Getting a server connected to an iSCSI or fibre channel SAN is generally straightforward. Across platforms and products, there are many tools to go about doing this.

Windows Server 2008 offers a way to browse the SAN natively. This tool, Storage Explorer, is an Explorer-style console to view a local configuration and remote resources.

Storage Explorer puts all of the components of the SAN into one console for administrators. This can include providing the host bus adapter (HBA) information and quantity of interfaces. For each HBA, the worldwide port name (WWPN) is displayed in relationship to what server holds the WWPN and HBAs.

Storage Explorer will also show what switches and fabric are available to the HBA on the local system; or like with many other Windows tools, remote systems can be managed through Storage Explorer. Figure A shows a connection being made to a remote server using Storage Explorer.

Windows Server 2008

While this native operating system tool is convenient and easy to use for most installations, the purist side of the storage administrator will not prefer this type of tool. The standing preference among storage administrators is to use an end-to-end configured and supported solution from the storage vendors. In this configuration where there would be an Emulex HBA in the server, the configuration around the product would match various support levels on the storage side. This would include using the Emulex driver and the HBAnywhere local tool on Windows Server. For QLogic HBAs, the same may apply and use of the QLogic driver and the SANSurfer tool would perform the same function on the server side.

Storage Explorer fits nicely into connecting a system to a SAN quickly, especially if the HBA vendors do not have Windows Server 2008 support for the driver and management tools.

Source: http://www.builderau.com.au/program/windows/soa/Using-Storage-Explorer-in-Windows-Server-2008/0,339024644,339294715,00.htm

Wednesday, February 11, 2009

How can I install Windows 7 or Windows Server 2008 R2 to a virtual hard disk (VHD) file?

Windows 7 and windows Server 2008 R2 add the ability for an OS to be installed onto a virtual hard disk (VHD) file to boot physical hardware. To do this, perform the following steps: Boot from the Windows 7 or Server 2008 R2 media.

Select language options and click Next. At the Install Now screen, press Shift and F10 simultaneously to open a command prompt window. You'll partition the disks and create your VHD file in this window.

Select the disk and wipe all of its existing content using the following commands. diskpart list disk select disk 0 clean Create a 200 MB system partition using the following commands. The Windows 7 and Server 2008 R2 installation procedures normally create this partition automatically. create part primary size=200 format fs=ntfs label="System" quick active Create a partition using the rest of the space on the disk.

This partition will hold the VHD files. I call the partition Boot, but you can call whatever makes sense for you. Also, I've used the C drive, but when you boot to the VHD the drive letters will shift. If you assign a different letter, make sure to use the new letter in step 7. create part primary format fs=ntfs label="Boot" quick assign letter=C Create a VHD file on the C drive. In this example, I've created it as a 25 GB file that is an expandable disk.

You can use "type=fixed" instead of "type=expandable" to create a fixed-size VHD. A fixed-size VHD will use space on the physical disk equal to its full size as soon as the VHD is created but will give better performance, so I recommend fixed-size disks for uses other than testing. create vdisk file=c:\win7ult.vhd maximum=25000 type=expandable select vdisk file=c:\win7ult.vhd attach vdisk create partition primary format fs=ntfs label="Win7Boot" quick You can now list your volumes with the command list vol An example list is shown here.

Click to expand Exit Diskpart and close the command prompt window by entering the "exit" twice. Proceed with the installation. When you're asked to select the installation target, choose the VHD partition you created. The installer will warn that you cannot install it on the partition, but you can ignore the warning.

Click to expand Installation will now progress as usual. Once installation is finished, you can see that the VHD partition is now the C drive while the partition containing the VHD files is demoted down to the D drive, as shown here. If you look at the contents of the drives, you'll see D contains the VHD file and C, the content of the VHD, looks like a standard drive with a Windows installation. The 200 MB partition you created doesn't have a drive letter and is essentially invisible to the OS.

Source: http://windowsitpro.com/mobile/pda/Article.cfm?ArticleID=101456&FAQ=1

Thursday, February 5, 2009

Business Security for Small Business

Here would be a couple of pointers to reduce threats in security for your small business.

Try to scrutinize your employees before hiring them. You might want to check their personal references and a conduct a background check. Like the common preventative measures, it would be less expensive compared to having to deal with the bad consequences. However, it would take time.

Limit the access that your employees have to your company data and server. If you have a server room which is regularly locked, however the person who keeps the key to that room keeps it on his desk which is accessible by anybody, then what you are doing is pretty much useless.

Require your employees to use good password, which should be regularly changed. This may cause some negative reactions, but it would prove to be a security measure that would be valuable in the long run.

Make sure that your data is backed up regularly. It would be advisable to backup company data daily, if possible. And at weekends, you would also need to do a backup, which would be taken off site and then stored.

Invest on a virus protection software, as well as a digital intrusion detection software which must be installed and reviewed regularly. If you would be outsourcing your IT services, the company which would be providing these services should also be able to provide a virus protection software this for you.

Though it could be possible to go a bit overboard on the security measures, which you would be using, there are actually a handful of companies who do so and a lot do not even have a basic security plan in place. If your business is important to you, it would definitely be important to invest in an excellent and effective small business security coverage.

Source: http://www.articlesbase.com/web-hosting-articles/business-security-for-small-business-373589.html

Tuesday, February 3, 2009

Windows Server 2003 Install and Configure Automatic Client Update Settings

Install and Configure Automatic Client Update Settings: The client components for SUS are contained in Windows 2000 SP 3, Windows XP SP 1, in all Windows 2003 installations and as an msi file. For Windows 2000 SP 3 or later, no additional component installation is necessary. Older client operating system machines can either download the necessary components from the Microsoft public Web site, or create a package from the msi file and Group Policy for distribution internally. The recommended way to configure SUS behavior for Windows 2000 and Windows XP clients is through Group Policy. Group Policy settings always take precedence over local settings.

In Group Policy, select Computer Configuration | Administrative Templates | Windows Components | Windows Update .Double-clicking on Configure Automatic Updates will open the initial configuration dialog.

Once enabled, you have to choose from three options (2, 3 or 4) for the notification behavior. If 4 is chosen, then the update can be scheduled. This is the primary configuration for client settings. The other major setting is the next setting, Specify intranet Windows update service location. This allows you to tell the client the server from which to download updates, and also where to send statistics relating to downloads.

Configure Software Updates on Earlier Operating Systems: For earlier Windows operating systems, Group Policy will not be effective. For Windows NT, Microsoft recommends using the System Policy editor. For all down level, clients use registry edits. Use these edits with caution because they can cause serious problems on a machine. The registry settings are stored in HKLM\Software\Policies\Microsoft\Windows\WindowsUpdate\AU. To specify the server running SUS that you want your clients and servers to connect to for their Windows updates, you need to add two entries to the registry in the subkey HKLM\Software\Policies\Microsoft\Windows\WindowsUpdate. For the required entries, see

Entry Name Values Data Type
WUServer The HTTP name for the Windows Update intranet server (for example, http://intranetsus). Reg_SZ
WUStatusServer The HTTP name for the Windows Update intranet server (for example, http://intranetsus). Reg_SZ

Source: http://www.trcb.com/Computers-and-Technology/Windows-Server-2003/Windows-Server-2003-Install-and-Configure-Automatic-Client-Update-Settings-2204.htm