Friday, April 24, 2009

How To Install Windows Small Business Server 2008?

Windows Small Business Severs 2008 (SBS 2008) is the successor to SBS 2003, and it brings the various components SBS is based on up to date.

Installing Small Business Sever 2008

The main purpose of SBS 2008 is so that small businesses without technical support staff can take advantage of Microsoft’s powerful, but complex server based technologies. For this reason, most people will purchase a SBS 2008 server from the manufacturer with SBS 2008 already installed.

In that case, setup will only require handling the server configurations steps. However, in the interest of being complete, we’ll cover the full installation from the DVD installation media.

If you’ve setup a couple of workstations before, you may be used to installing the computer and then worrying about getting the network setup later.

With SBS 2008, it needs the network connection from the very beginning, so this is not an option. Make sure that your live network connection is plugged into the SBS 2008 server before starting the installation.

1. Put the SBS 2008 DVD in the DVD drive and power up the computer. Your specific computer will determine what you see as the server boots up.

Look for a message that says something like, "Boot Menu," or "Choose Boot Device," or "Press F10 To Enter Boot Menu".

The server may go right to a screen which allows a choice of boot device based on detecting the boo table SBS 2008 DVD in the drive.

2. Select to boot from the DVD.

3. If you’ve never installed a Server in a country other than America, the next three questions seem a little silly. Choose the Language, the Time and Currency format, and the Keyboard Type.

4. Click Next, and then Install Now.

5. Inputting the product key and agreeing to the license agreement are next. Now, we can get down to some real business.

6. Choose Custom for the installation type. This allows you to choose where to put the operating system.

Ideally, SBS 2008 should have the operating system on its own partition on its own hard disk and the data on a separate partition and separate disk or disks.

To accomplish this, select the disk the operating system is to be installed on and Choose Drive Options and click New.

The default partition size that appears will be the size of the entire disk. Click Apply and setup will create a single partition which fills the entire disk. This will be the SBS 2008 system partition.

7. Setup will begin copying files to do the install. Keep in mind that this is around 60GB worth of files, so even on a fast system, this will take several minutes.

Source: http://www.trainsignaltraining.com/how-to-install-windows-small-business-server-2008/2008-12-02/

Monday, April 20, 2009

How to Install Web server on Windows Server 2008 from a script

You can usually add features through the Windows Server 2008 Server Manager snap-in via a script. In the case of IIS 7.0, there are many options available for the feature install.

One way to ensure a consistent configuration for applications that require IIS (e.g., SQL Server) is to use a scripted installation. For IIS, the package manager can install the features locally. To install a basic IIS configuration, run the following script:

start /w pkgmgr /iu:IIS-WebServerRole;IIS-WebServerManagementTools;
IIS-ManagementService;IIS-Metabase;WAS-WindowsActivationService;
WAS-ProcessModel;WAS-NetFxEnvironment;WAS-ConfigurationAPI

The command provides little interaction and, by default, does not provide feedback of any type if an incorrect parameter is passed after the /iu parameter. Figure A shows IIS being added via the script.

Install Web server on Windows Server 2008

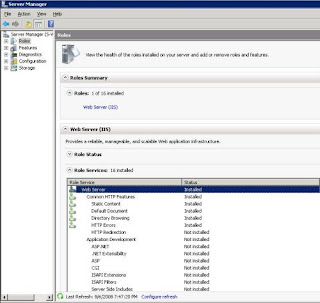
Once the scripted task completes after a minute or so, and the Window Server 2008 Server Manager snap-in performs its next refresh, the Web server is listed as a role on the system and is running. Figure B shows an updated Server Manager snap-in with this basic IIS role.

Windows server 2008

Using this scripted install of IIS is a good way to ensure consistent server build configurations, and other Windows features can be automated through the package manager (pkgmgr). The package manager can also uninstall packages, which may be helpful for temporarily enabling a feature for a specified amount of time and for removing the feature from a scheduled task to ensure its decommissioning.

Source: http://blogs.techrepublic.com.com/datacenter/?p=442

Wednesday, April 15, 2009

Windows Server 2008 Feature: Special Ops Software Password Policy and Password Reset

One of several significant advancements introduced in Windows Server 2008 domain functional level is the ability to configure multiple password policies targeting arbitrarily selected Active Directory users or global groups. While this new functionality, referred to as Fine-Grained Password Policies, brings long-awaited flexibility to rigid security structure that used to influence design of forest hierarchy (forcing the creation of additional domains whenever non-uniform rules governing password history, age, length, complexity or lockout behavior were required), its benefits remain somewhat limited. In particular, due to functional-level dependency, its implementation requires all domain controllers run Windows Server 2008. In addition, because Fine-Grained Password Policies lacks a friendly graphical interface, administrators must resort to a fairly cumbersome ADSIEdit console whenever a custom policy definition or configuration is needed.

Furthermore, the scope of these policies is determined based on global group membership, rather than the location of a target user within a designated Organizational Units, which further complicates their management.

If these shortcomings are not acceptable to you or if you are looking for more advanced password-related capabilities, you might want to consider taking advantage of third-party offerings, which go beyond the limited set of features built into the operating system.


Special Operations Software specializes in products targeting Windows environments with intention of filling functionality and manageability gaps existing in their original feature sets designed by Microsoft. In general, its portfolio can be grouped into several broader categories, such as system management, compliance or security, based on the type of need they address, with a certain degree of overlap between them.

Since the resulting restrictions become part of the User Configuration node of a Group Policy Object, they function in the same manner as other group policy settings. For this reason, they can be linked to individual Organizational Units and limited, if desired, based on security filtering to specific domain users or groups only. Note, however, that resulting passwords must comply not only with custom restrictions imposed by Specops password definitions but also with domain-wide, built-in password policy imposed via domain-level GPO. In addition, if you decide to install optional Active Directory Users and Computers extension, you will be able to determine password policies affecting individual user accounts (via Specops Password Policy... entry in the context-sensitive menu of their objects displayed in the management console) from the administrative systems where Specops Password Policy Admin is present.

For Detail Info visit: http://www.enterpriseitplanet.com/security/features/article.php/11321_3812801_1

Thursday, April 9, 2009

How to Install IIS Server 7.0 On Windows Server 2008

Internet Information Services 7.0 is a Web server component that is included with Windows Server 2008. By installing the service, you can turn your computer into a powerful Web server to host your Web sites, applications
and so on.

IIS 7.0 is not installed by default on Windows Server 2008. You can install IIS using Server Manager. The ‘Add Roles Wizard’ will walk you through the process and prompt you for any required information. The steps for installing IIS 7.0 are described in detail below.

  • Click Start, point to Administrative Tools and click Server Manager.
  • Click Add Roles.
  • The Add Roles Wizard will appear. Click Next.
  • If any required features are missing, you will be prompted to install them by clicking the Add Required Features button.
  • From the Select Server Roles window, click the box beside the Web Server (IIS) option. Click Next.
  • Click Next.
  • Select the specific role services to install for IIS. If you are unsure what a service is for, select the service and a short description will appear.
  • Click Next.
  • Review your installation selections and click Install.
  • When the installation is complete, review the results in the ‘Installation Results’ window and click Close.
Source From: http://www.lockergnome.com

Thursday, April 2, 2009

How to Configure Wireless settings via Group Policy

Wireless networking in an office environment can supplement the Ethernet network in case of an outage or, in some cases, replace it altogether. Using Wireless Access Points (WAPs) to connect remote users or desktop PCs can be a very simple way to get everything up and running quickly. And leveraging the power and centralization of Active Directory when setting up your wireless infrastructure can save time for all parties involved.

Getting started

To get the ball rolling, I suggest creating a new Group Policy Object (GPO) to configure for Wireless settings. This will keep all the wireless settings contained so they can be enabled and disabled easily. Note: when performing the steps needed to configure these settings, I will be using the Group Policy Management Console (GPMC) — available at Microsoft downloads.

Follow these steps:

1. Open the GPMC from the Administrative Tools menu.
2. Expand the Forest node on the left pane of the console.
3. Expand Domains and expand your domain.
4. Locate the Organizational Unit (OU) where you wish to link the GPO.
5. Right-click the OU and select Create and Link a GPO Here.

Note: Once the GPO is added here, any objects that exist in this OU will have the policies defined by the linked GPOs applied to them.

Enter a name for the GPO you are creating and click OK. Doing this will create the object and link to the OU. Be sure to use a descriptive name for the GPO to make future management a bit easier. Once the object is created, there will be no settings defined within the object. Right-click the GPO and select edit to configure the settings you need.
Many, many settings for a GPO

When opening the GPO for editing, there will be many options available for configuration. To find the Wireless settings, expand the computer configuration node, then expand Windows Settings and from there, Security Settings.

Listed under Security Settings you will see Wireless Network (IEEE 802.11) Policies. Click on this node to display any existing configuration items.
Creating a new Wireless Network Policy

Right-click in the details pane on the right of the console with the Wireless Network Policies node highlighted and select Create Wireless Network Policy.

This will open the Wireless Network Policy Wizard. Click Next to bypass the welcome screen. On the next screen, enter a name for the Wireless Network Policy and a description.

Note: Using a description can help you in the event that modifications are needed later.

Clicking Next in the dialog box will complete the wizard and display the Completing the Wireless Network Policy Wizard dialog box. Leave the Edit properties box checked so that you can move right into creating the settings for the policy.

On the properties sheet for the Wireless network policy, the general page displays the settings created by the wizard, the name and description, but also allows you to configure the following:

* Check for Policy Changes Every x Minutes allows you to set the interval for checking for updates.
* Networks to Access options:
o Any available network (access point preferred)
o Access point (infrastructure) networks only
o Computer to computer (ad hoc) networks only
* Use Windows to Configure Wireless Network Settings for Clients allows Windows to manage the wireless settings on client computers.
* Automatically Connect to Non-Preferred Networks allows you to connect to networks that are not listed on the preferred tab of the properties dialog box.

For More Information visit: http://blogs.techrepublic.com.com/networking/?p=1093&tag=rbxccnbtr1